Google Cloud Tutorial
Google Cloud Tutorial
Note: This tutorial is modified from Stanford 231n course. In their class, each student has $100 google cloud credit and an image file is provided. However, we do not have these resource. You can also use Amazon AWS and you need to go through similar setup routine. However, you have $300 credits if you sign up for the first time.
BEFORE WE BEGIN
BIG REMINDER: Make sure you stop your instances!
(We know you won’t read until the very bottom once your assignment is running, so we are printing this at the top too since it is super important)
Don’t forget to stop your instance when you are done (by clicking on the stop button at the top of the page showing your instances), otherwise you will run out of credits and that will be very sad. :(
If you follow our instructions below correctly, you should be able to restart your instance and the downloaded software will still be available.

Create and Configure Your Account
For the class project and assignments, we offer an option to use Google Compute Engine for developing and testing your implementations. This tutorial lists the necessary steps of working on the assignments using Google Cloud. We expect this tutorial to take about an hour. Don’t get intimidated by the steps, we tried to make the tutorial detailed so that you are less likely to get stuck on a particular step. Please tag all questions related to Google Cloud with google_cloud on Piazza.
This tutorial goes through how to set up your own Google Compute Engine (GCE) instance to work on the assignments. When you sign up for the first time, you receive $300 credits from Google by default. Please try to use the resources judiciously.
First, if you don’t have a Google Cloud account already, create one by going to the Google Cloud homepage and clicking on Compute. When you get to the next page, click on the blue TRY IT FREE button. If you are not logged into gmail, you will see a page that looks like the one below. Sign into your gmail account or create a new one if you do not already have an account.
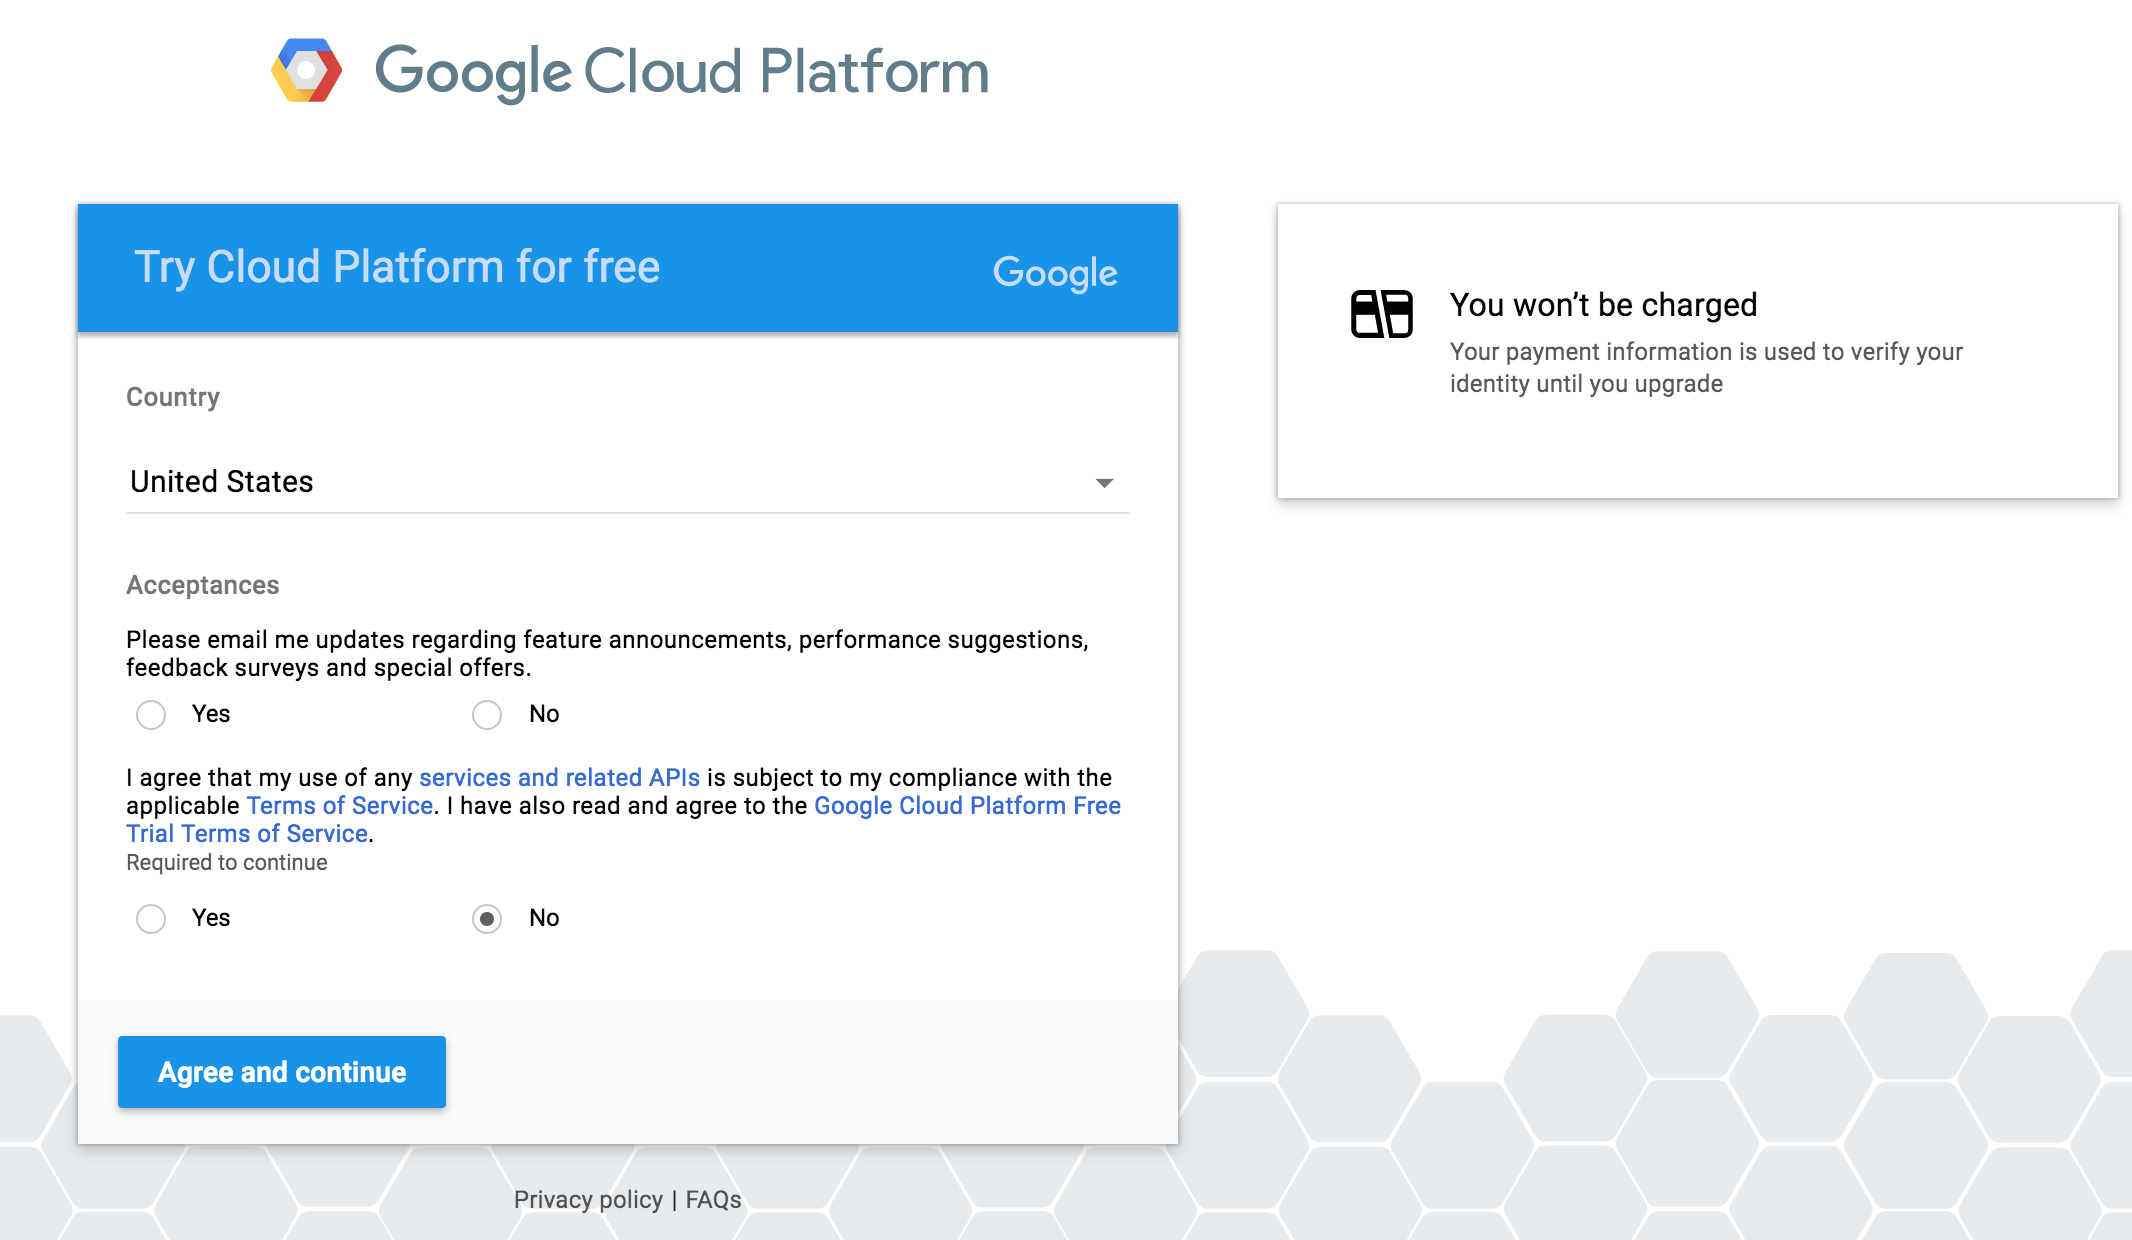
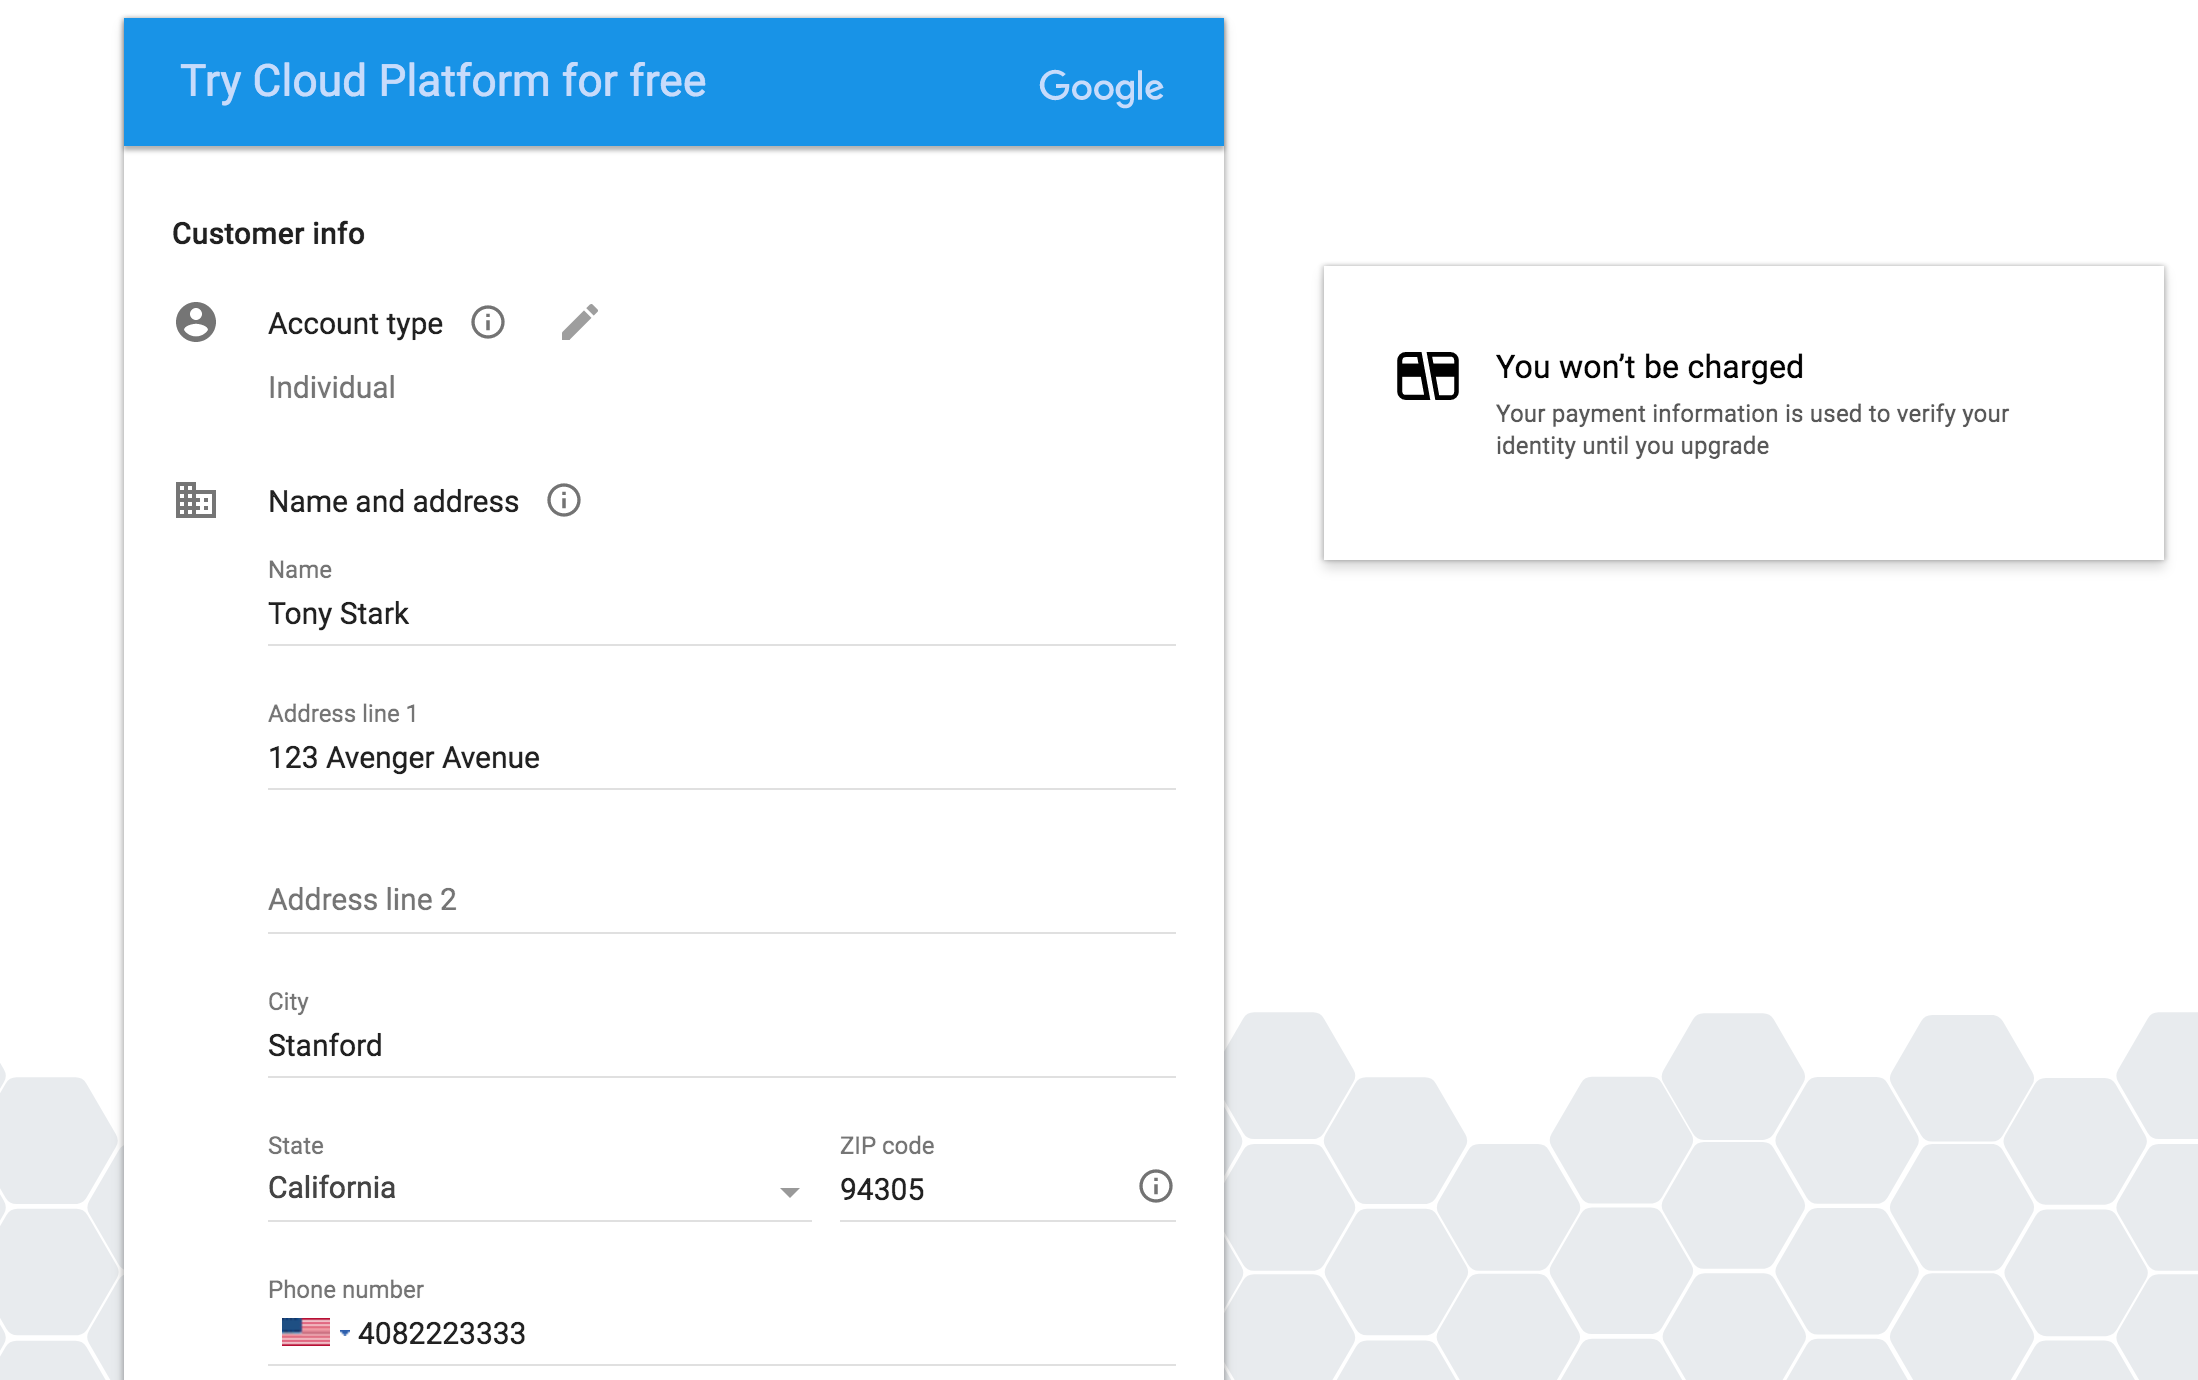
Click the appropriate yes or no button for the first option, and check yes for the second option after you have read the required agreements. Press the blue Agree and continue button to continue to the next page to enter the requested information (your name, billing address and credit card information). Remember to select “Individual” as “Account Type”:
Once you have entered the required information, press the blue Start my free trial button. You will be greeted by a page like this:
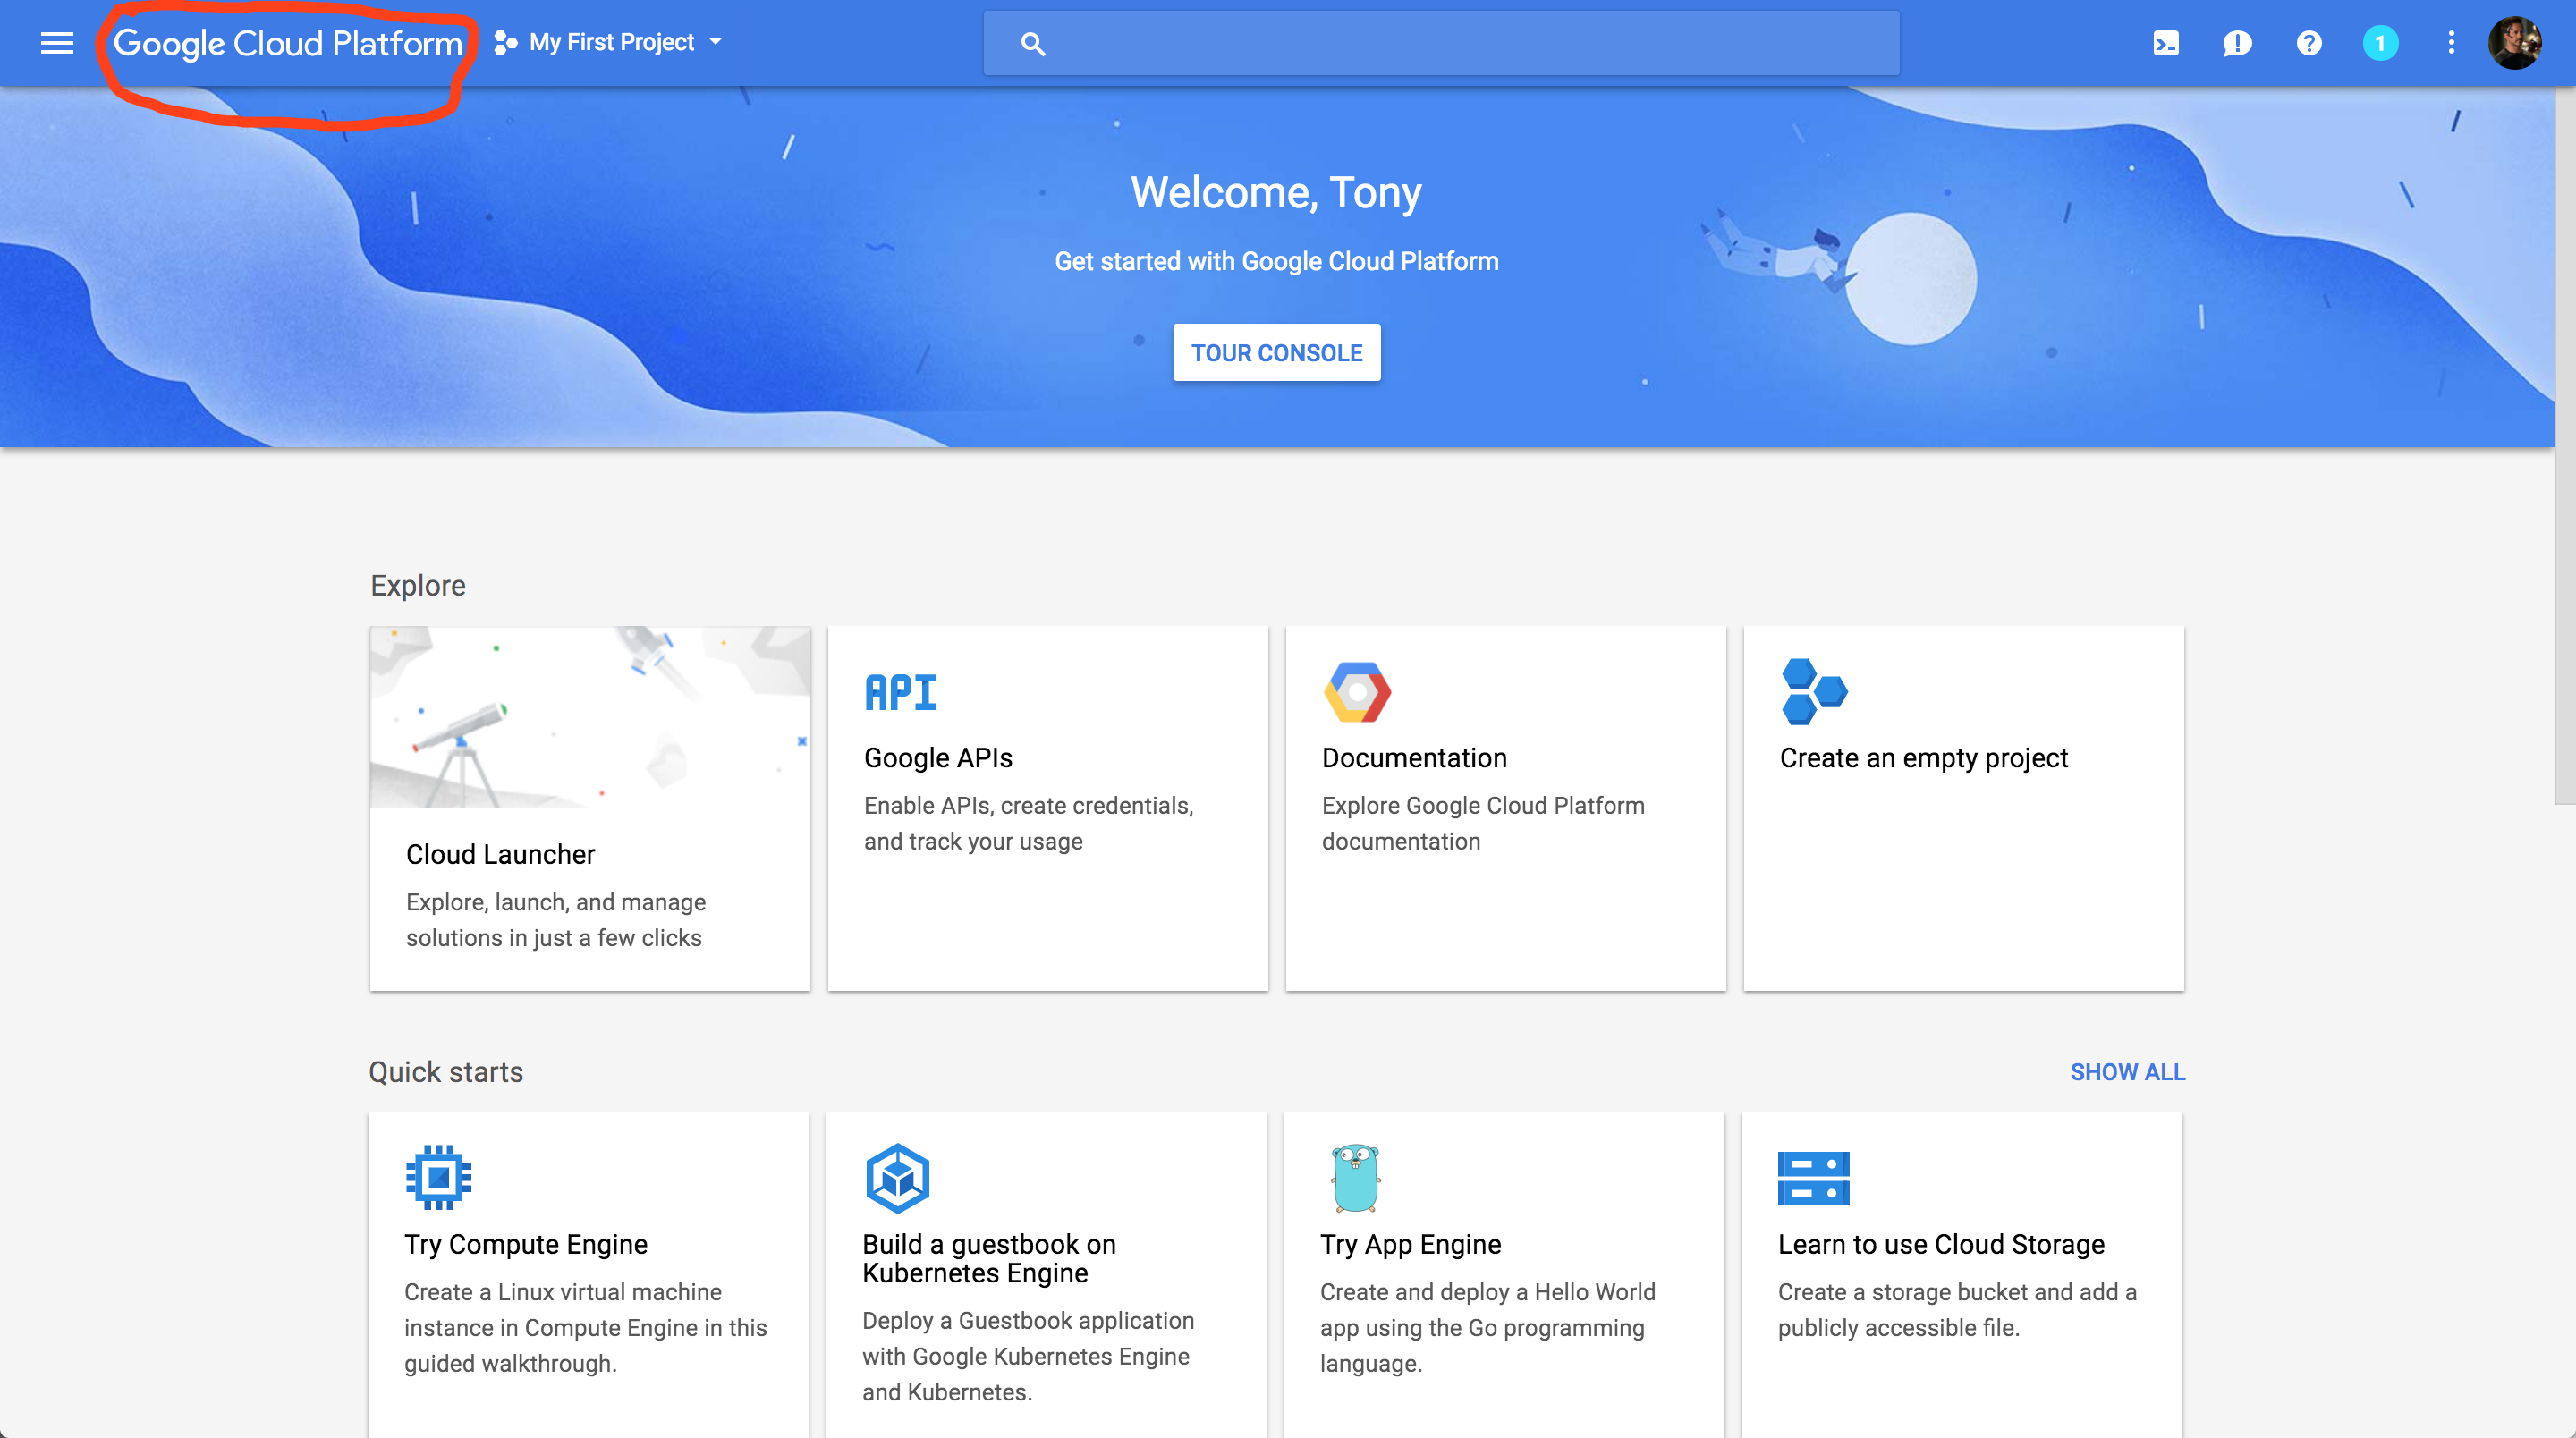
Press the “Google Cloud Platform” (in red circle), and it will take you to the main dashboard:
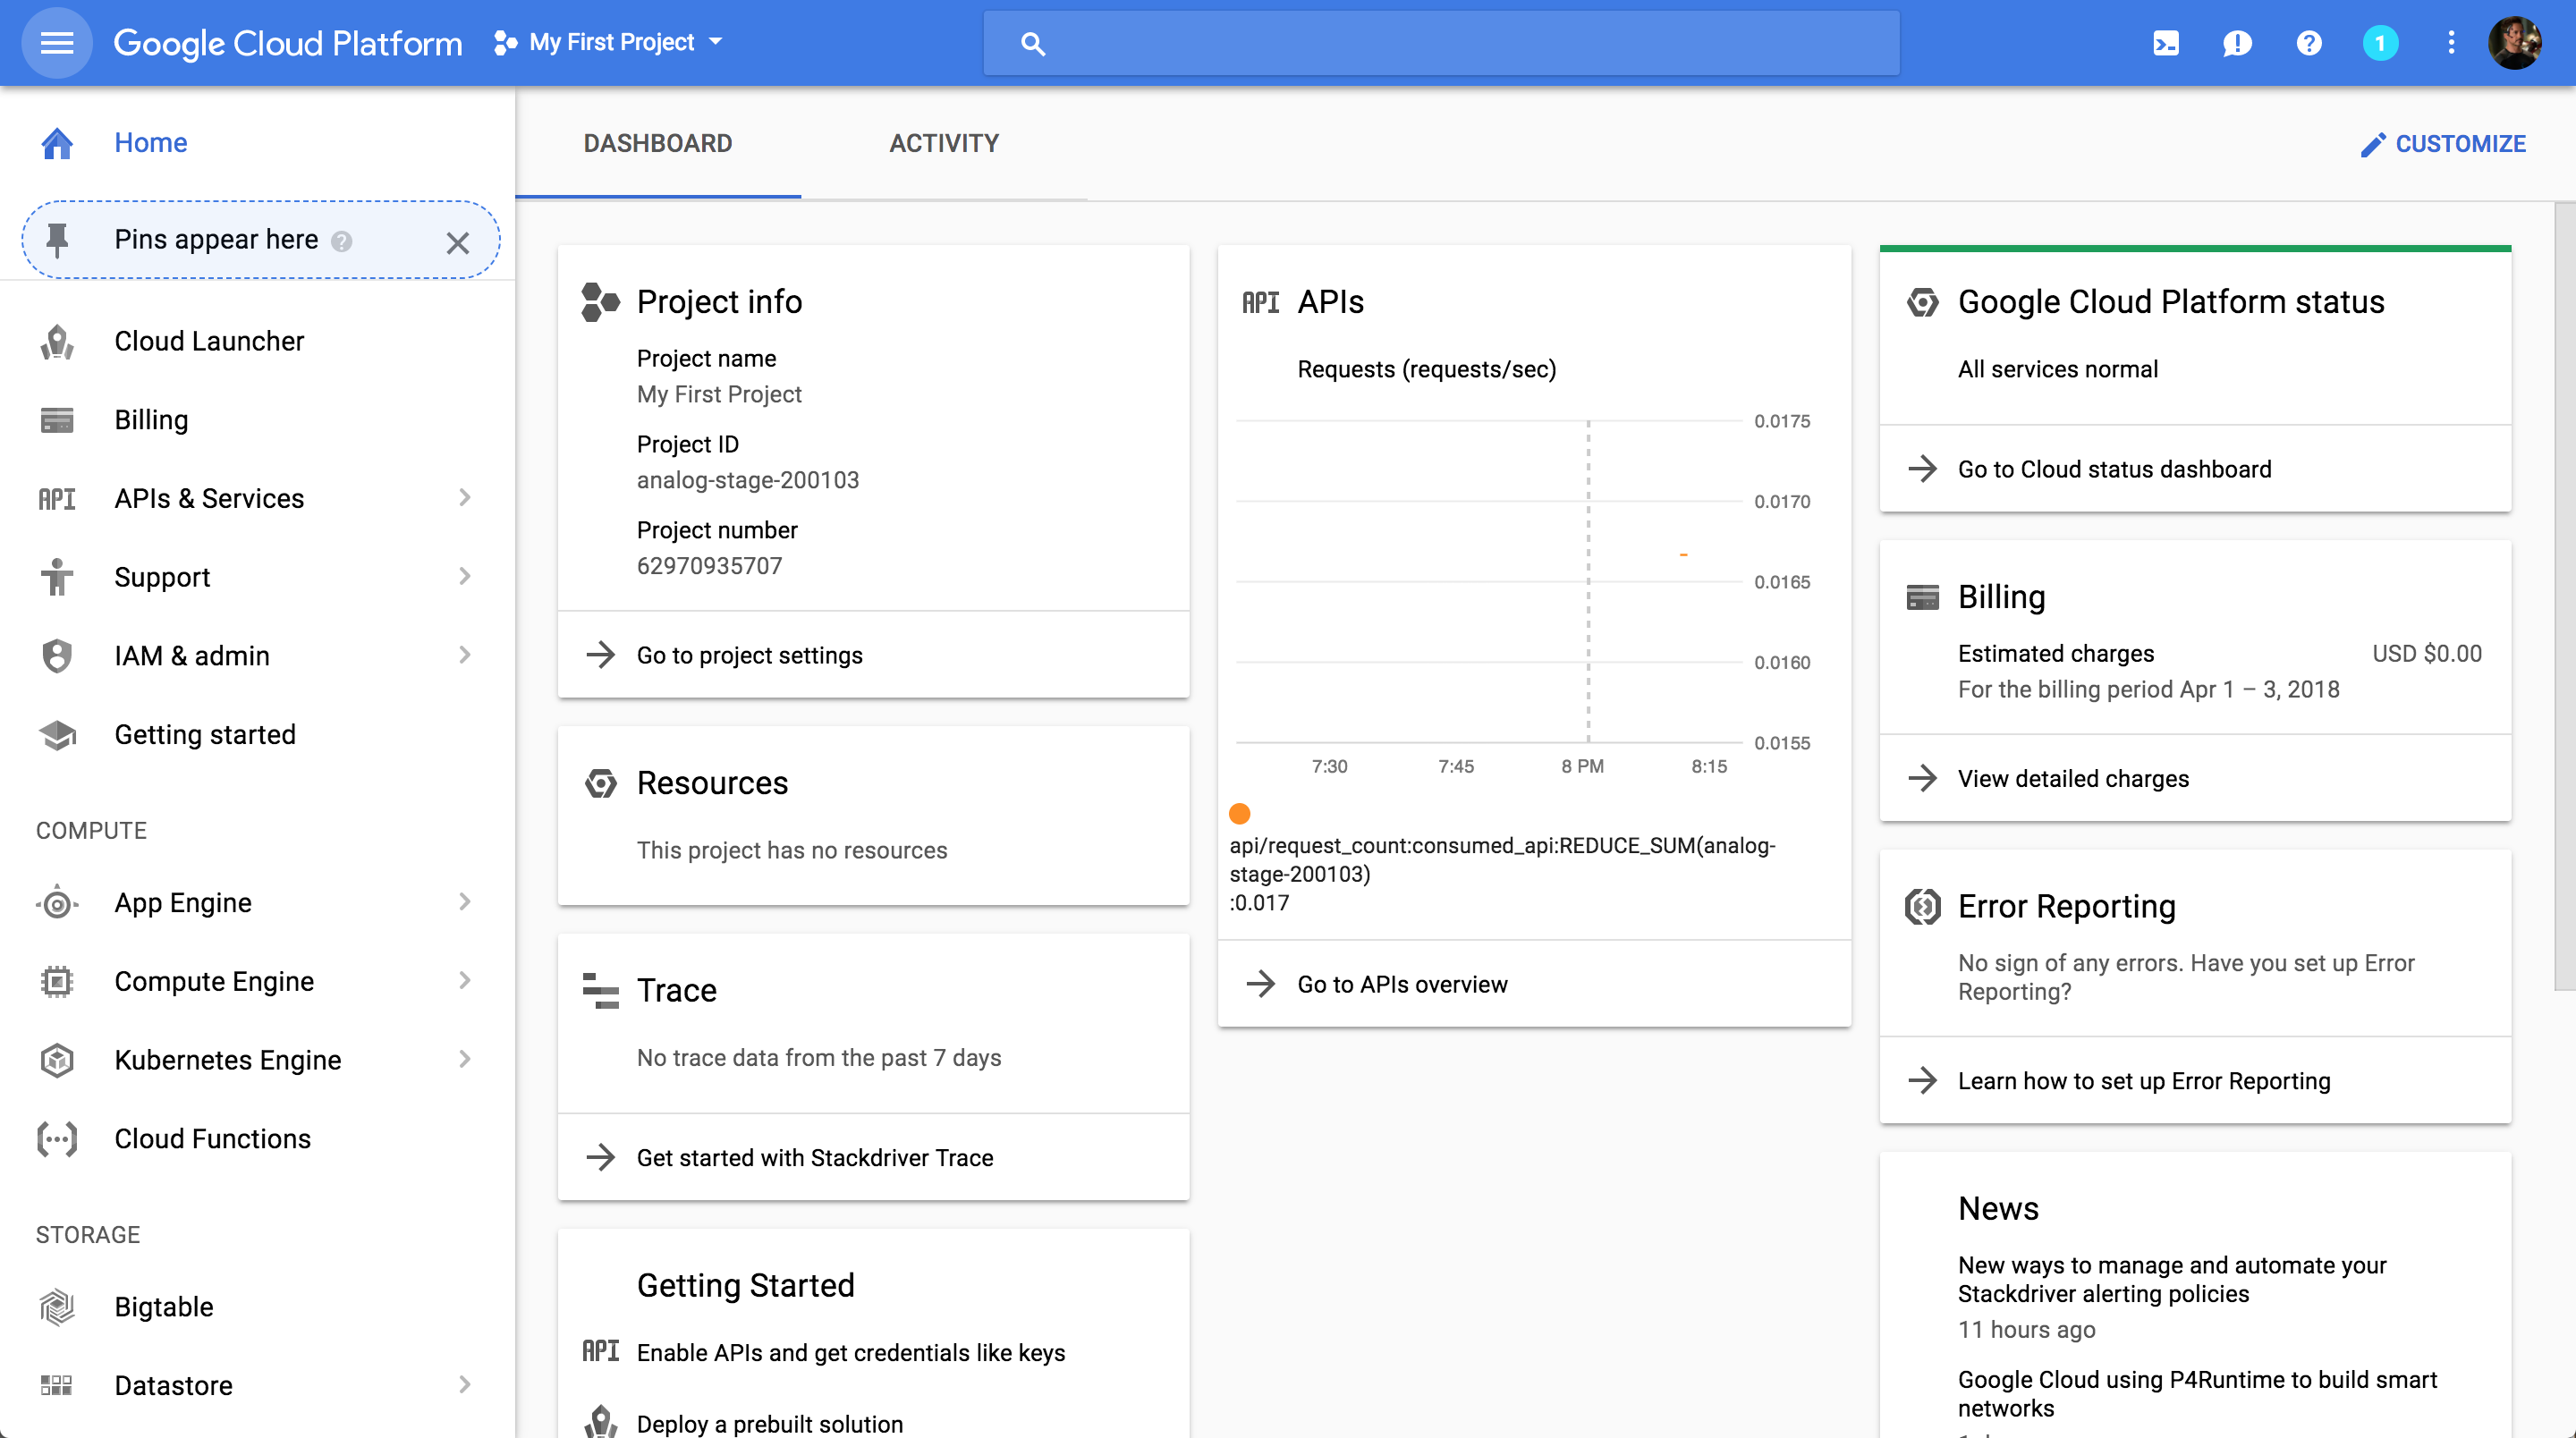
To change the name of your project, click on Go to project settings under the Project info section.
Launch a Virtual Instance
To launch a virtual instance, go to the Compute Engine menu on the left column of your dashboard and click on VM instances.
Then click on the blue Create button on the next page. This will take you to a page that looks like the screenshot below. (NOTE: Please carefully read the instructions in addition to looking at the screenshots. The instructions tell you exactly what values to fill in).

Make sure that the Zone is set to be us-east1-b (especially for assignments where you need to use GPU instances). Under Machine type pick the 8 vCPUs option. Click on the customize button under Machine type and make sure that the number of cores is set to 8 and the number of GPUs is set to None (or 1 if you want to use GPU. GPU costs money so be careful!).
Click on the Change button under Boot disk, choose OS images, you will see this screen:
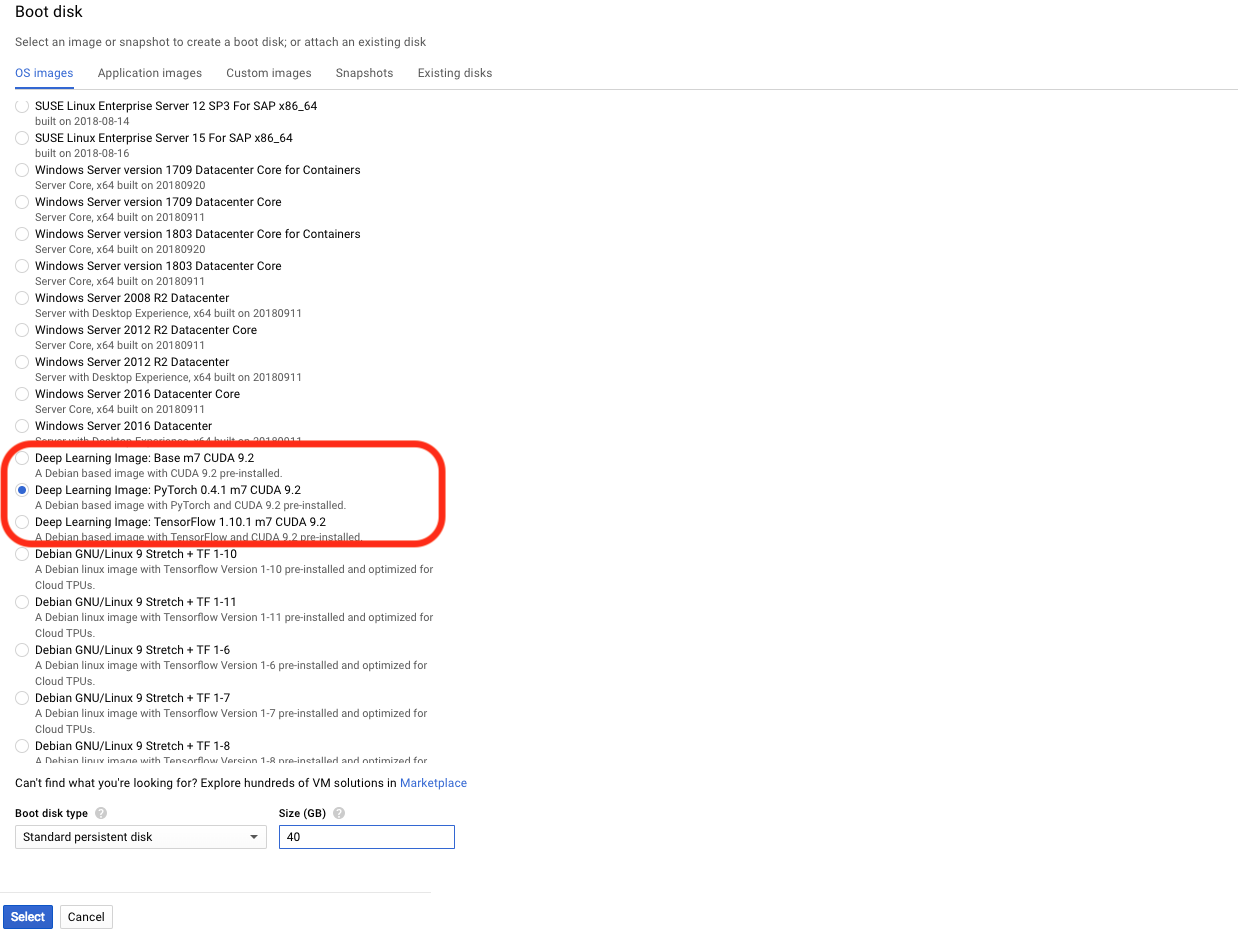
Select an image with deep learning packages installed. You can choose from Base, PyTorch, or TensorFlow. You can always install new packages by yourself after creating an instance. Here I choose Deep Learning Image: PyTorch 0.4.1 m7 CUDA 9.2 for example. Also increase the boot disk size as you see fit. Click Select and you will get back to the “create instance” screen.
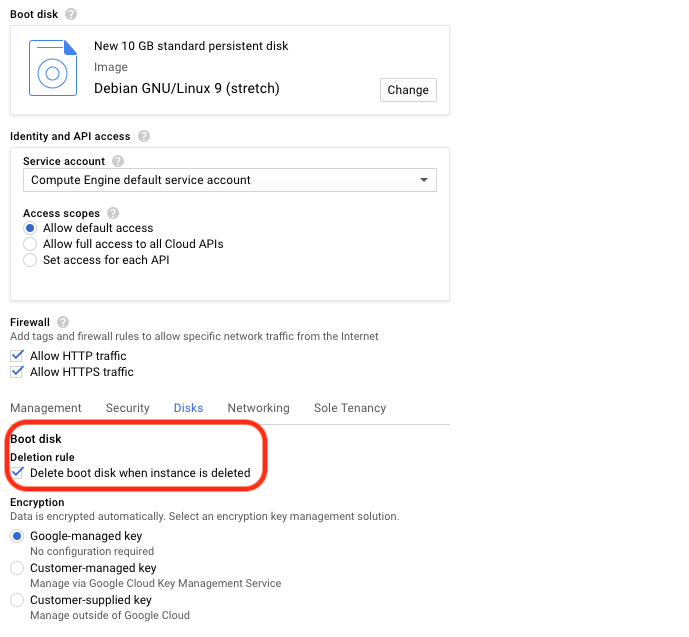
Check Allow HTTP traffic and Allow HTTPS traffic. Expand the Management, disks, networking, SSH keys menu if it isn’t visible, select Disks tab, and uncheck Delete boot disk when instance is deleted.
Click on the blue Create button at the bottom of the page. You should have now successfully created a Google Compute Instance, it might take a few minutes to start running. When the instance is ready, your screen should look something like the one below. When you want to stop running the instance, click on the blue stop button above.
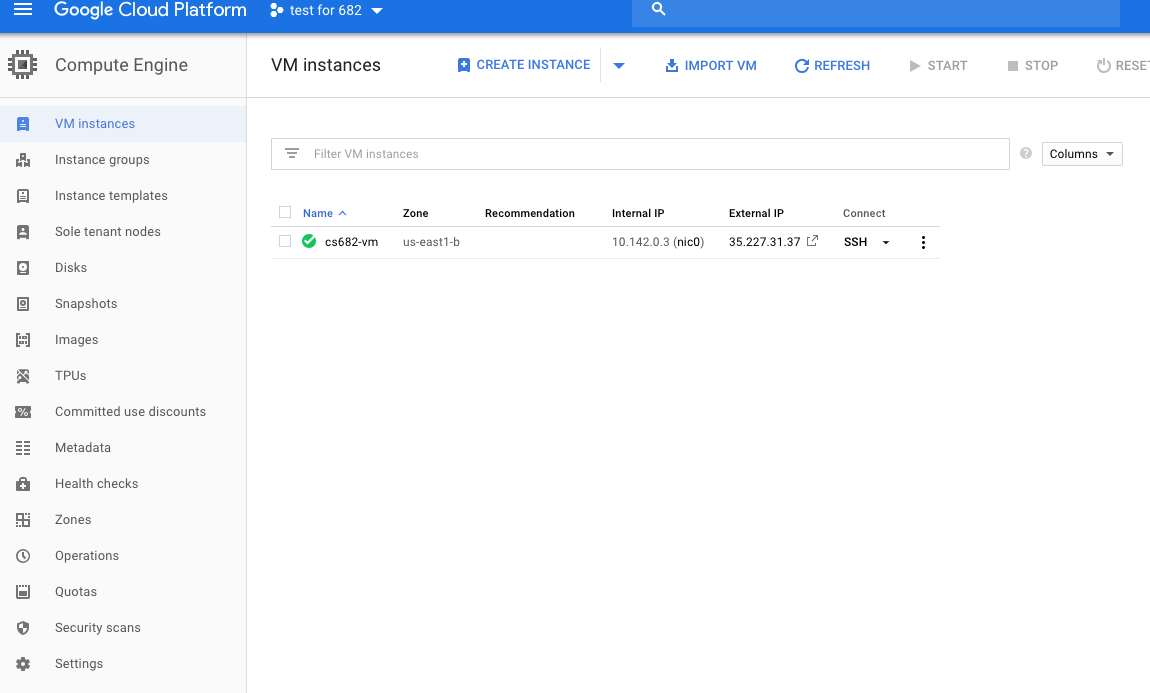
Take note of your instance name, you will need it to ssh from your laptop.
Connect to Your Virtual Instance
Now that you have created your virtual GCE, you want to be able to connect to it from your computer. The rest of this tutorial goes over how to do that using the command line. First, download the Google Cloud SDK that is appropriate for your platform from here and follow their installation instructions. NOTE: this tutorial assumes that you have performed step #4 on the website which they list as optional. When prompted, make sure you select us-east1-b as the time zone.
The easiest way to connect is using the gcloud compute command below. The tool takes care of authentication for you. On your laptop (OS X for example), run:
gcloud compute ssh --zone=us-east1-b <YOUR-INSTANCE-NAME>
If gcloud command is not in system path, you can also reference it by its full path /<DIRECTORY-WHERE-GOOGLE-CLOUD-IS-INSTALLED>/bin/gcloud. See this page for more detailed instructions.
First time setup
Upon your first ssh, you will be asked to install Nvidia-driver. Choose yes to install, and the system will reboot. Use ssh to log in again. You will find the default setting is python 2. If you use python3, the pre-installed python 3.5 under /usr/bin/python3.5 will be used. Feel free to install newer version if you like. These are some pre-installed packages you will use:
- Numpy, matplotlib, and tons of other common scientific computing packages.
- ipython, jupyter notebook.
- Tensorflow 1.10, both CPU and GPU.
- PyTorch 0.4, both CPU and GPU.
- Nvidia runtime: CUDA 9.0 and cuDNN 7.0. They only work when you create a Cloud GPU instance, which we will cover later.
You can also install anaconda3 if you prefer:
- Anaconda3, a python package manager. You can think of it as an alternative to
pip.
You are now ready to work on the assignments on Google Cloud!
Using Jupyter Notebook with Google Compute Engine
Many of the assignments will involve using Jupyter Notebook. Below, we discuss how to run Jupyter Notebook from your GCE instance and connect to it with your local browser.
Getting a Static IP Address
Change the External IP address of your GCE instance to be static (see screenshot below).
To Do this, click on the 3 line icon next to the Google Cloud Platform button on the top left corner of your screen, go to VPC network and External IP addresses (see screenshot below).
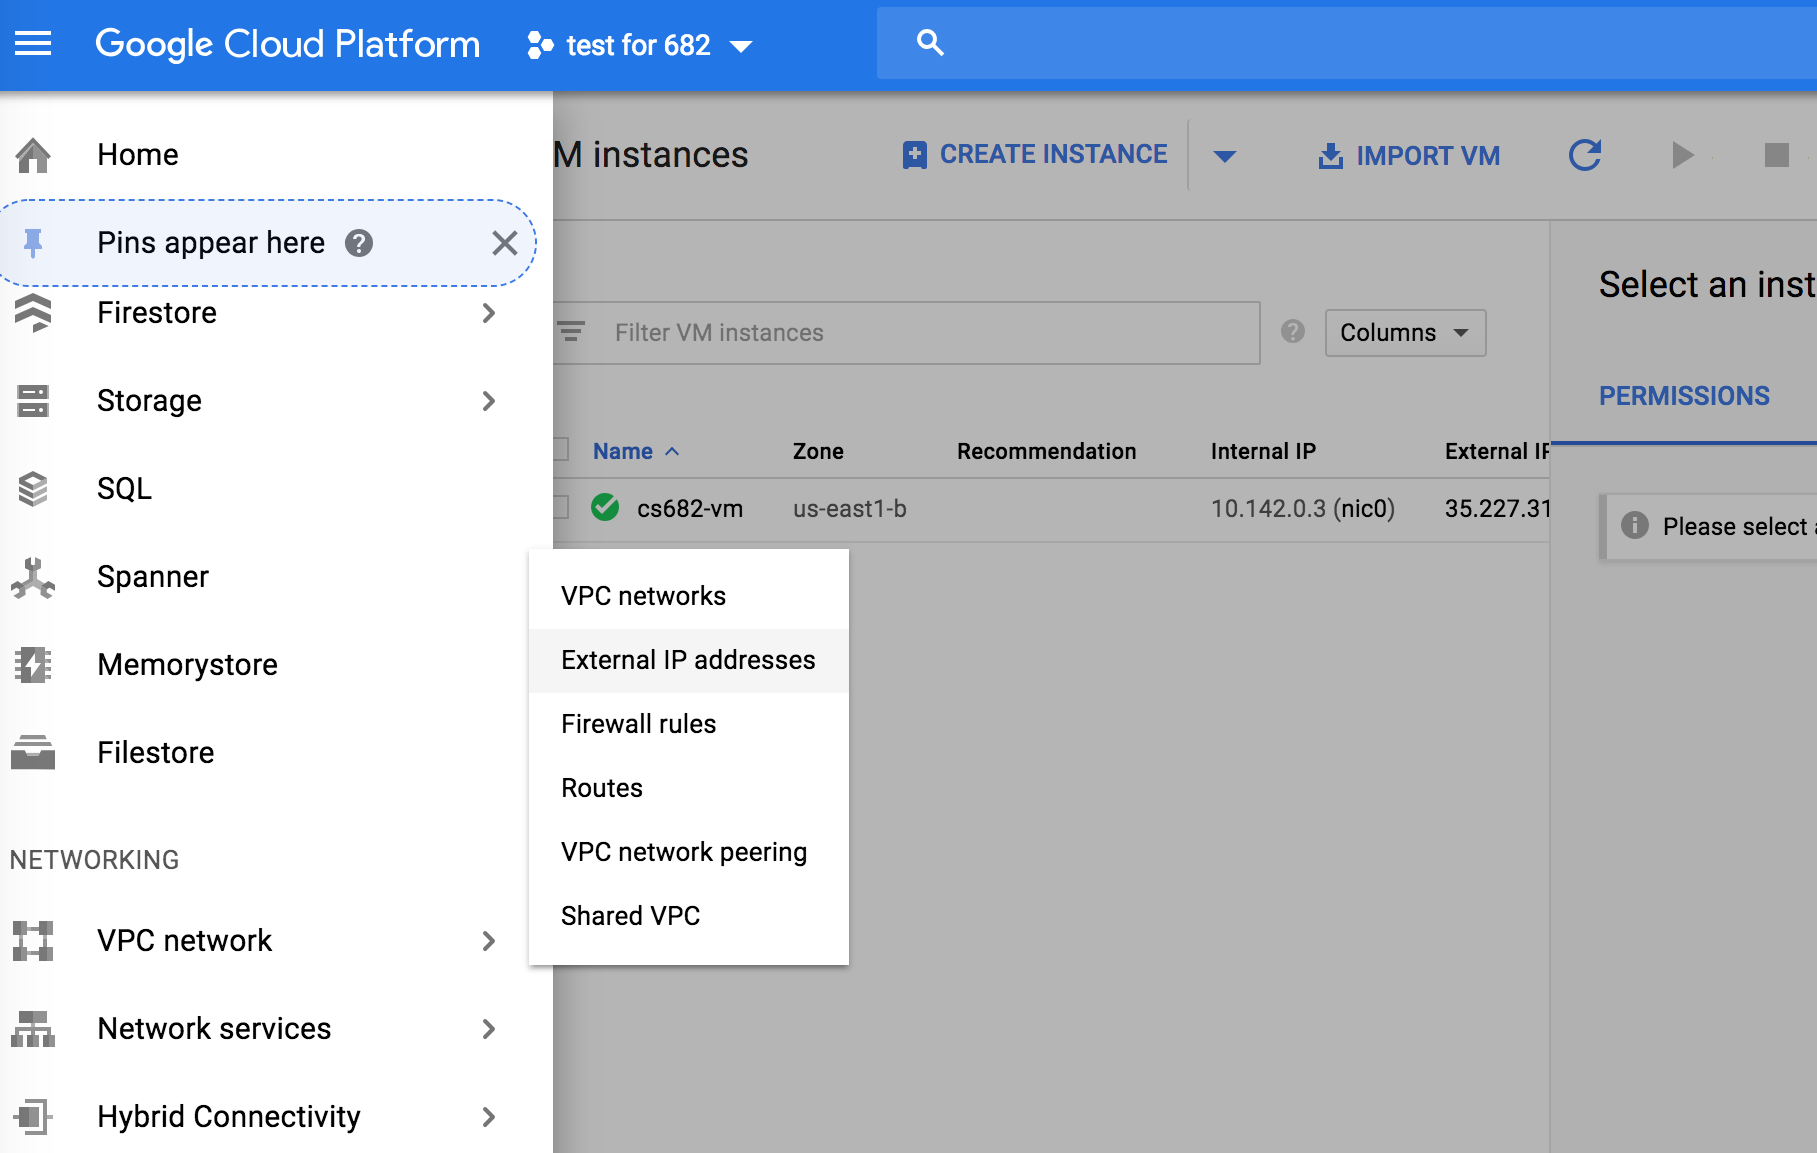
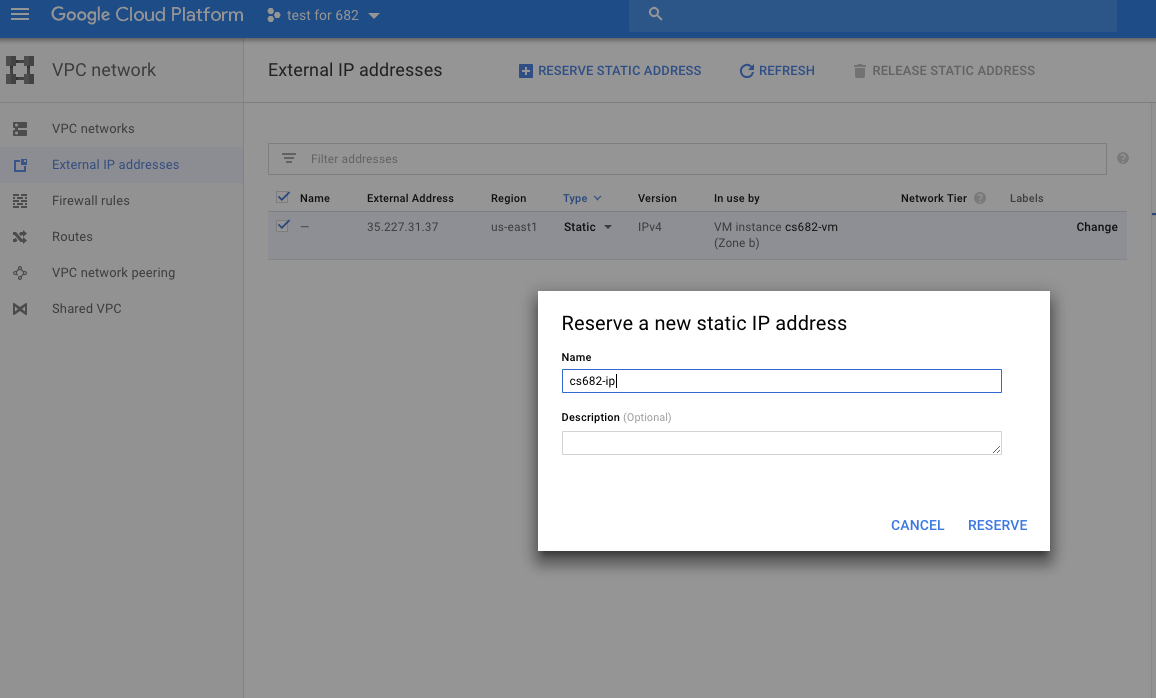
To have a static IP address, change Type from Ephemeral to Static. Enter your prefered name for your static IP, ours is cs682-ip (see screenshot below). And click on Reserve. Remember to release the static IP address when you are done because according to this page Google charges a small fee for unused static IPs.
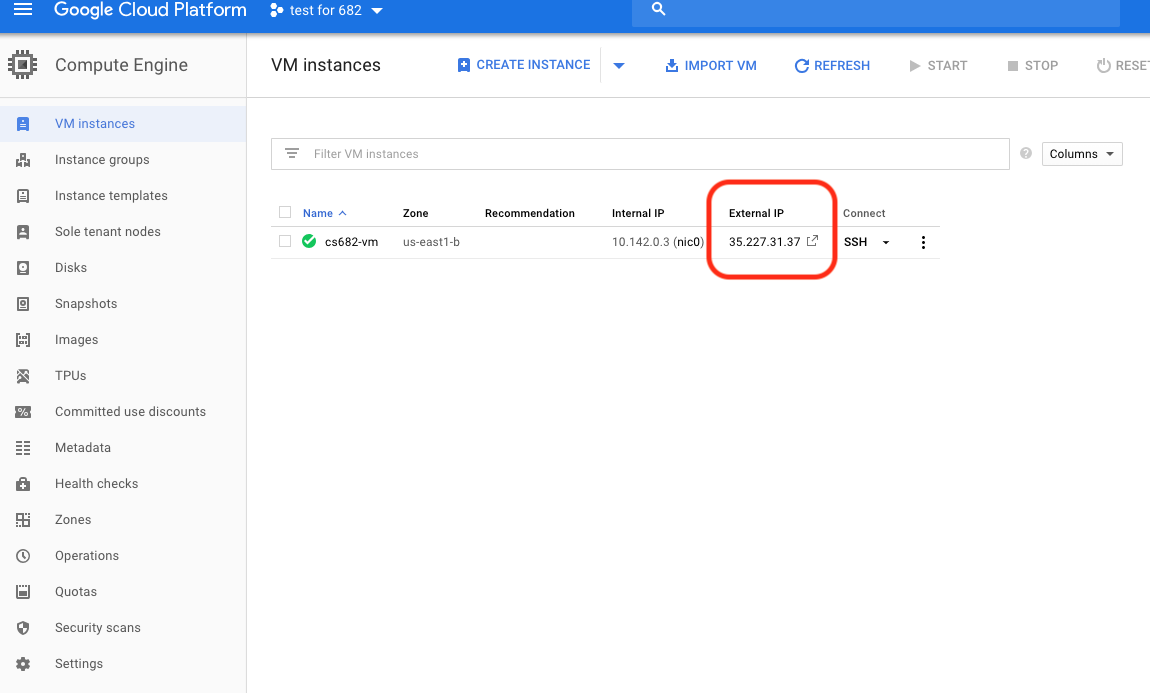
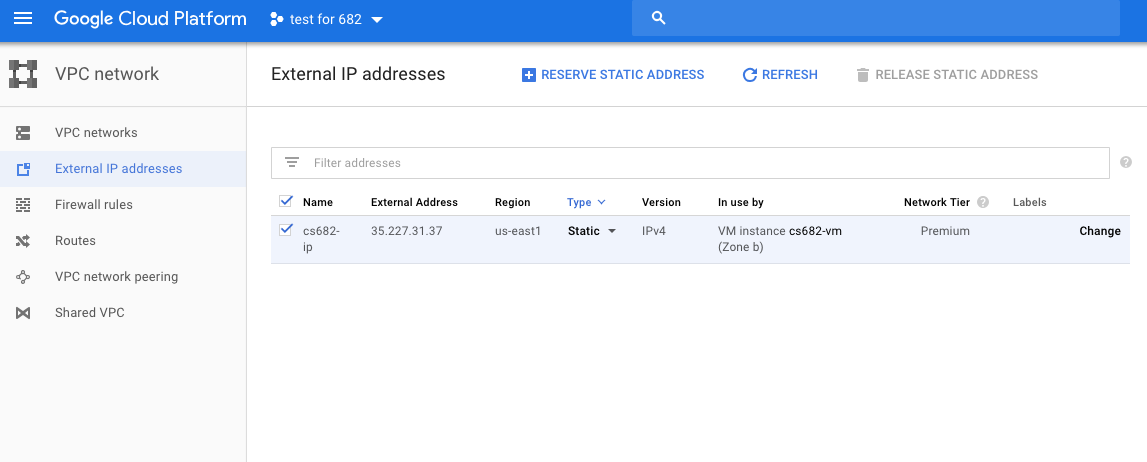
Take note of your Static IP address (circled on the screenshot below). We use 35.227.31.37 for this tutorial.
Adding a Firewall rule
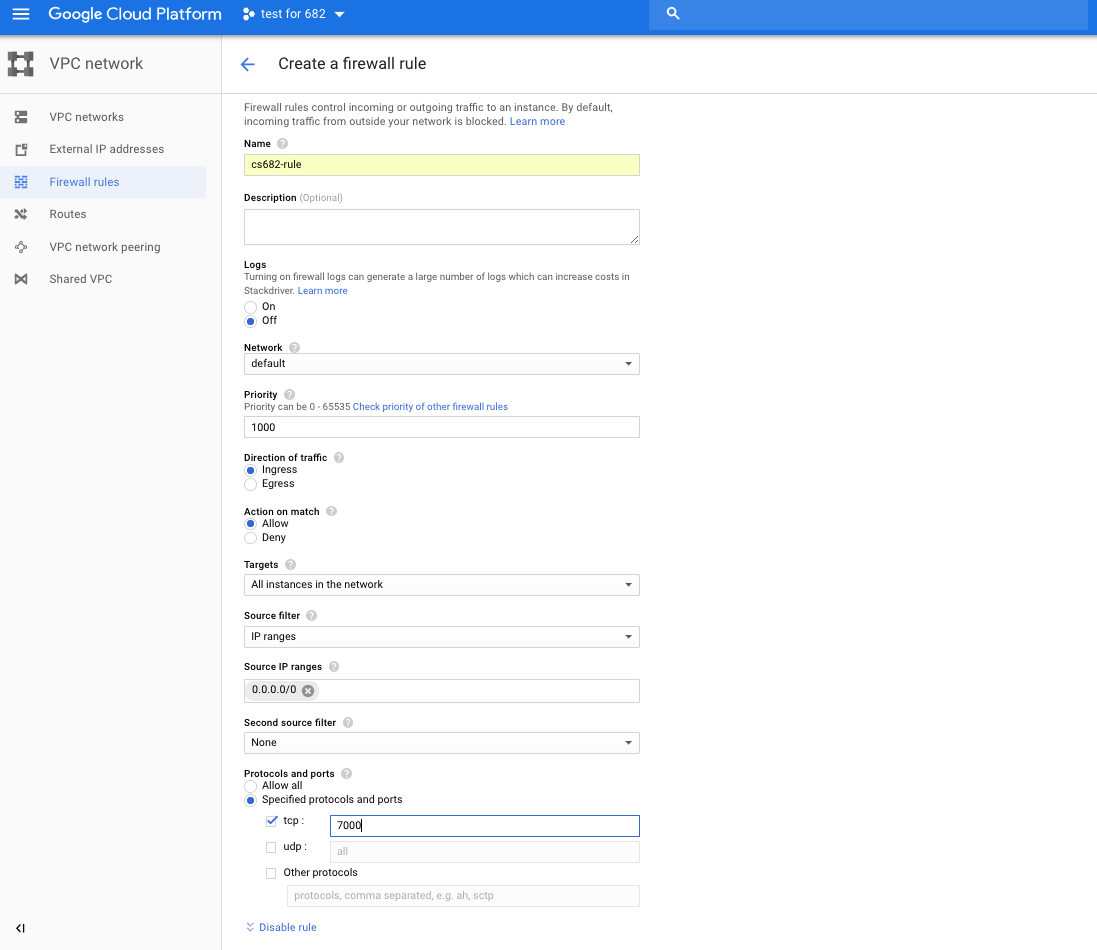
One last thing you have to do is adding a new firewall rule allowing TCP access to a particular port number. The default port we use for Jupyter is 7000. You can setup the default value in the config file (you can generate and change the config file at ~/.jupyter/jupyter_notebook_config.py, but this is not necessary. )
Click on the 3-line icon at the top of the page next to Google Cloud Platform. On the menu that pops up on the left column, go to VPC network and Firewall rules (see the screenshot below).
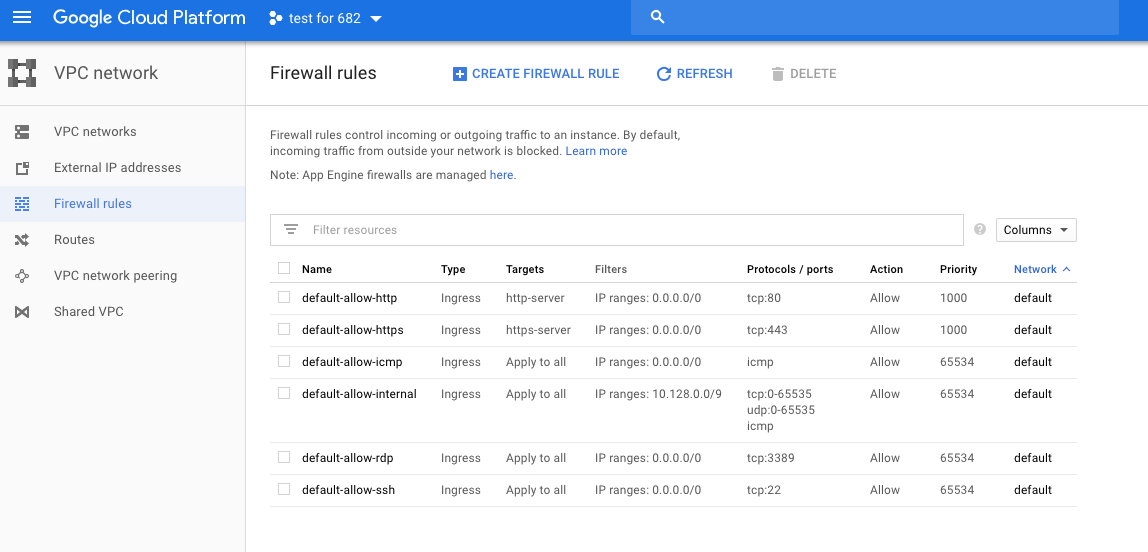
Click on the blue CREATE FIREWALL RULE button. Enter whatever name you want: we use cs682-rule. Select “All instances in the network” for Targets (if the menu item exists). Enter 0.0.0.0/0 for Source IP ranges and tcp:<port-number> for Specified protocols and ports where <port-number> is the number you used above. Click on the blue Create button. See the screenshot below.
Launching and connecting to Jupyter Notebook
After you ssh into your GCE instance using the prior instructions, run Jupyter notebook from the folder with your assignment files.
jupyter-notebook --no-browser --port=7000 --ip=0.0.0.0
The command should block your stdin and display something like:
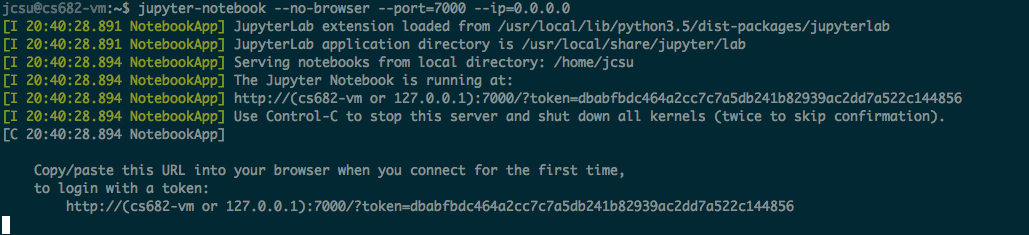
The important line (underscored in red) has the token for you to login from laptop. Replace the “localhost” part with your external IP address created in prior steps. In our example, the URL should be
http://35.227.31.37:7000/?token=dbabfbdc464a2cc7c7a5db241b82939ac2dd7a522c144856
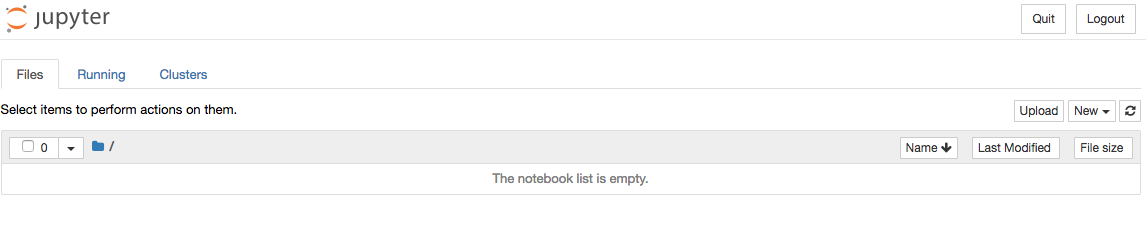
If there is no token, simply go to http://35.227.31.37:7000.
If you visit the above URL on your local browser, you should see something like the screen below.
Transferring Files From Your Computer To Your Instance
To upload a file to GCE:
gcloud compute scp /my/local/file tonystark@cs682-vm:
When you are done with your assignments, run the submission script in your assignment folder to make a zip file. Please refer to specific instructions for each assignment.
Once you create the zip file, e.g. assignment1.zip, you will transfer the file from GCE instance to your local laptop. There is an easy command for this purpose:
gcloud compute scp <user>@<instance-name>:/path/to/assignment1.zip /local/path
For example, to download files from our instance to the current folder:
gcloud compute scp tonystark@cs682-vm:assignment1.zip .
Another (perhaps easier) option proposed by a student is to directly download the zip file from Jupyter. After running the submission script and creating assignment1.zip, you can download that file directly from Jupyter. To do this, go to Jupyter Notebook and click on the zip file, which will be downloaded to your local computer.
BIG REMINDER: Make sure you stop your instances!
Don’t forget to stop your instance when you are done (by clicking on the stop button at the top of the page showing your instances). You can restart your instance and the downloaded software will still be available.
We have seen students who left their instances running for many days and ran out of credits. You will be charged per hour when your instance is running. This includes code development time. We encourage you to read up on Google Cloud, regularly keep track of your credits and not solely rely on our tutorials.